The first thing to do after you install Footprint Expert is
to open "Tools > Options" in the upper left.

Console Options are unique for every user. If you edit any value in Console Options, the changes will be saved as:
File Name: ConsoleOptions.opt
Folder Name: C:\Program Files (x86)\PCB Libraries\Footprint Expert 25
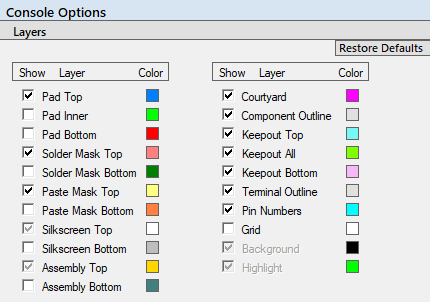
1. Layers

a. Show Layer
- This toggle button turns layers on/off. The default layers are turned on, but you can turn on/off any layers you want to see in the Footprint Calculator and FP Designer. Most Bottom layers are turned off by default because surface mount footprints do not have features on the bottom layer. If you do a lot of through-hole library parts, you may want to turn on the bottom layers.
b. Color
- The default colors were randomly selected, but you can change the colors
by selecting the color and open the Basic Colors dialog window.

- Select "Define Custom Colors" to create your unique color.

- You can specify the RGB numbers for an exact color, or scroll up/down or move the cursor in the color display.
2. Show Order

a. Select
a Layer and use the up/down arrows to rearrange the Layer Order. This option
changes the dropdown Layer Display in the Footprint Calculator. The Component
Outline is the default layer on the top when you use the Footprint Expert
calculators.

3. File > Save
a. When you have completed all your Console Option modifications,
select the "File" menu in the in the upper left, and "Save".

4. Exit Options
a. Select File > Exit
The Console Options are intended for each individual user, unlike the Calculator Options that should be used by everyone in the company to create a corporate PCB Library with 100% consistent quality. The Calculator Options .opt file could be placed on a server and all Footprint Expert users load that custom file. The Console Options are normally saved in the installation folder for each unique user.
If you have any questions regarding Console Options, contact us:
https://www.PCBLibraries.com/ContactUs

 LOGIN
LOGIN Downloads


